Testing Docker networking with GNS3, Part1: MaCVLAN
June 27, 2017 Leave a comment
Introduction
MacVLAN allows to connect containers in separate docker networks to your VLAN infrastructure, so they act like being directly connected to your network.
From the main interface, MacVLAN driver creates subinterfaces to handle 802.1q tags for each VLAN, and assign to them separate IP and MAC addresses.
Because the main interface (with its own MAC) has to accept traffic toward subinterfaces (with their own MACs), Docker network driver MacVLAN requires Docker host interface to be in promiscuous mode.
Knowing that, most cloud providers (aws, azure…) do not allow promiscuous mode, you’ll be deploying MACVLAN on your own premises.
MacVLAN network characteristics:
| Creates subintefaces to process VLAN tags |
| Assign different IP and MAC addresses to each subinterface |
| Requires the main Docker host intreface to function in promiscuous mode to accept traffic not destined to main interface MAC. |
| The admin needs to carefully assign ranges of IP’s to VLANs in different Docker nodes in harmony with an eventual DHCP range used by the existing VLANs |
Conceptual diagram: Docker node connected to the topology

Conceptual diagram: MACVLAN configured

Conceptual diagram: Logical functioning of MACVLAN

Purpose of this lab:
- To test and get hands on practice with Docker MACVLAN.
- It is easy to deploy complex topologies in GNS3 using a meriad of virtual appliances https://gns3.com/marketplace/appliances. Building a topology is as easy as dragging devices and drawing the connections betweeen them.
 Note:
Note:
It is better to have some basic practical knowledge of docker containers.
1- GNS3 topology:

Devices used:
- Two VMWare Virtual machines for docker nodes, imported into GNS3.
- Two OpenvSwitch containers gns3/openvswitch. Import & Insert
- Ansible container ajnouri/ansible used as SSH client to manage Docker nodes. In another post I’ll be showing how to use it to provision package installation to any device (ex: Docker instalaltion to VMWare nodes).
- Cisco IOSv 15.6(2)T: Route-on-a-stick used to route traffic from each vlan to outside world (PAT) and deploy communication policy between VLANs. Import & Insert
Note:
Atually importing a container into GNS3 is very easy and intuitive, here is a video from David Bomball explaining the process.
- Create two VMWare Ubuntu xenial LTS servers to be used as Docker nodes, with 1Gig RAM and 2 interfaces.
-
Install Docker min 1.12 (latest recommended).
Here is the script if you want to automate the deployment of Docker, for example from an ansible container, like shown in this GNS3 container series (managing GNS3 appliances with Ansible).
#!/bin/bash
 ### Install GNS3
 sudo add-apt-repository ppa:gns3/ppa
 sudo apt-get update
 sudo apt-get install -y gns3-gui
 sudo apt-get install -y gns3-server# Add Oficial docker repository GPG signature

### Install Docker
 # https://docs.docker.com/engine/installation/linux/ubuntu/
 curl -fsSL https://download.docker.com/linux/ubuntu/gpg | sudo apt-key add -# Add apt repository sources
 sudo add-apt-repository "deb [arch=amd64] https://download.docker.com/linux/ubuntu $(lsb_release -cs) stable"
 sudo apt-get update

# Install Docker CE
 sudo apt-get install -y docker-ce# Docker without sudo
 sudo groupadd docker
 sudo gpasswd -a $USER docker
$docker version
Client:
Version:      17.03.1-ce
API version:  1.27
Go version:   go1.7.5
Git commit:   c6d412e
Built:        Mon Mar 27 17:14:09 2017
OS/Arch:      linux/amd64
Server:
Version:      17.03.1-ce
API version:  1.27 (minimum version 1.12)
Go version:   go1.7.5
Git commit:   c6d412e
Built:        Mon Mar 27 17:14:09 2017
OS/Arch:      linux/amd64
Experimental: false
Docker node interfaces:
Main interface: e0/0 (Ubuntu: ens33), a trunk interface used to connect containers to your network VLANs
Management interface: e1/0 (ubuntu: ens38) connected to the common VLAN114
Interface configuration (/etc/netwoork/interfaces):
# The primary network interface
auto ens33
iface ens33 inet manual
auto ens38
iface ens38 inet static
address 192.168.114.32
netmask 24
gateway 192.168.114.200
up echo "nameserver 8.8.8.8" > /etc/resolv.conf

# autoconfigured IPv6 interfaces
iface ens33 inet6 auto
iface ens38 inet6 auto
Promiscuous mode:
Without proomiscuous mode, containers will not be able to communicate with hosts outside of docker node, because the main interface (connected to the VLAN network) will not accept traffic to other MAC addresses (those of MACVLAN)
Promiscuous mode is configured in two steps:
Configuring Promiscuous mode on VMWare guest:
Add the below command to /etc/rc.local
ifconfig ens33 up promisc
Check for the letter “P” for Promiscuous
netstat -i
Kernel Interface table
Iface   MTU Met   RX-OK RX-ERR RX-DRP RX-OVR    TX-OK TX-ERR TX-DRP TX-OVR Flg
docker0    1500 0         0      0      0 0             0      0      0      0 BMU
ens33      1500 0        25      0      0 0            32      0      0      0 BMPRU
ens38      1500 0        55      0      0 0            60      0      0      0 BMRU
ens33.10   1500 0         0      0      0 0             8      0      0      0 BMRU
ens33.20   1500 0         0      0      0 0             8      0      0      0 BMRU
ens33.30   1500 0         0      0      0 0             8      0      0      0 BMRU
lo        65536 0       160      0      0 0           160      0      0      0 LRU
Authorizations for Promiscuous mode on VMWare host:
By default, VMWare interfaces will not function in promiscuous mode because a regular user will not have write access to /dev/vmnet* files.
So, Create a special group, include the user running vmware in the group and allow th rgroup to have right access to /dev/vmnet* files :
sudo groupadd promiscuous
sudo usermod -a -G promiscuous $USER
chgrp promiscuous /dev/vmnet*
chmod g+rw /dev/vmnet*
Or simply give right access to everyone:
chmod a+rw /dev/vmnet*
For permanent change, put it in /etc/init.d/vmware file as follow:
vmwareStartVmnet() {
 vmwareLoadModule $vnet
 "$BINDIR"/vmware-networks --start >> $VNETLIB_LOG 2>&1
 chmod a+rw /dev/vmnet*
}
GNS3 VLAN topology:
For each Docker node, connect the first interface to OpenVswitch1 trunk interface and the second interface to a VLAN interface 114.
VLAN 114 is a common VLAN used to reach and manage all other devices.
GNS3 integrates Docker, so you can use containers as simple endhost devices (independently of docker network drivers):
- gns3/openvswitch container: Simple L2 switch
- gns3/webterm container: GUI Firefox browser (no need for entire VM for that)
- ajnouri/ansible container: the management endhost used to access Docker nodes thourgh SSH. In subsequent lab, I’ll be showing how top manage GNS3 devices from this Ansible container.
Docker MACVLAN network allows to connect your containers to an existing network vlans seamlessly as they were directly connected to your VLAN infrstustructre.
The network is deploying three isolated VLANs (id: 10, 20 and 30) and vlan id 114 able to communicate with all three VLANs through a router on a stick (Cisco IOSv 15.6T).
MacVLAN generates subinterfaces (.) to process (tag/untag) traffic.
The parent (main) interface will act as a trunk interface carrying all vlans from “children” interfaces, so the network switch interface linked to it should be a trunk port.
OpenVswitch1 ports:
First, let’s clean the configuration and then reintroduce trunk and vlan ports:
for br in `ovs-vsctl list-br`; do ovs-vsctl del-br ${br}; done

#Trunk ports:
ovs-vsctl add-port br0 eth1
ovs-vsctl add-port br0 eth2
ovs-vsctl add-port br0 eth6

#vlan ports:
ovs-vsctl add-port br0 eth2 tag=114
ovs-vsctl add-port br0 eth4 tag=114
ovs-vsctl add-port br0 eth7 tag=114
ovs-vsctl show
7afbe760-5237-4ae4-a7e6-ac5b4f1cc6df
Bridge "br0"
…
Port "eth1"
Interface "eth1"
In OVS, untagged ports acts as trunk.
OpenVswitch2 ports:
Openvswitch 2 connects the two management endhosts, Ansible container and Firefox browser container.
for br in `ovs-vsctl list-br`; do ovs-vsctl del-br ${br}; done

#Trunk ports:
ovs-vsctl add-port br0 eth7

#vlan ports:
ovs-vsctl add-port br0 eth0 tag=114
ovs-vsctl add-port br0 eth1 tag=114
For more information on how to configure advanced switching features with ovs, please refer to my gns3 blog post on gns3 community.
Cisco router-on-a-stick configuration:
This router is used to allow inter-vlan communications between VLAN114 and all other VLANs, deny communications between VLANs 10,20 and 30, and connect the entire topolgy to Internet using PAT (Port Address Translation ~ Linux MASQUERADING).
Now you can scale your infrastructure by adding any numbe of new docker nodes.
2- Configuring MACVLAN network on docker node1
1) Create MacVLAN networks
Create MacVLAN networks with the following parameters:
- type=MacVLAN
- subnet & ip range from which the container will get their IP parameters
- Gateway of the VLAN in question
- parent interface
- MacVLAN network name
docker network create -d macvlan \
--subnet 10.0.0.0/24 \
--ip-range=10.0.0.0/26 \
--gateway=10.0.0.200 \
-o parent=ens33.10 macvlan10

docker network create -d macvlan \
--subnet 20.0.0.0/24 \
--ip-range=20.0.0.64/26 \
--gateway=20.0.0.200 \
-o parent=ens33.20 macvlan20

docker network create -d macvlan \
--subnet 30.0.0.0/24 \
--ip-range=30.0.0.128/26 \
--gateway=30.0.0.200 \
-o parent=ens33.30 macvlan30
List created the created subinterfaces with “ip a”
List docker networks with “docker network ls” and make sure the three macvlans are created
docker network ls
NETWORK ID          NAME                DRIVER              SCOPE
916165cd344c        bridge              bridge              local
686ebb8c5399        host                host                local
b3c9487a6cd0        macvlan10           macvlan             local
e1818c46a437        macvlan20           macvlan             local
52ce778548c3        macvlan30           macvlan             local
d97f45467edd        none                null                local
as an example, let’s inspect docker network macvlan10
docker network inspect macvlan10
Notice that, no containers are attached to the network: “Containers”: {},
Let’s remediate to that by running simple apache containers from a custom image ajnouri/apache_ssl_container image (You can use other appropriate image with “bash/sh” running on the console) and connect them respectively to macvlan10, macvlan20 and macvlan30.
2) start and connect containers to MacVLAN networks
docker run --net=macvlan10 -dt --name c11 --restart=unless-stopped ajnouri/apache_ssl_container
docker run --net=macvlan20 -dt --name c12 --restart=unless-stopped ajnouri/apache_ssl_container
docker run --net=macvlan30 -dt --name c13 --restart=unless-stopped ajnouri/apache_ssl_container
The first time, docker will download the image, then any container from that image is created instantly.
“docker run” command options:
- –net=macvlan10 : macvlan name
- -dt : run a console on the background
- –name c11: container name
- –restart=unless-stopped : if Docker host restart, containers are started & connected to their networks, except if they are intentionally stopped.
- ajnouri/apache_ssl_container : custom container with Apache SSL installed & small php script to detect session ip addresses
List running containers with “docker ps”
$ docker ps
CONTAINER ID        IMAGE                          COMMAND                  CREATED             STATUS              PORTS               NAMES
1a2104d84519        ajnouri/apache_ssl_container   "/bin/sh -c 'servi..."   6 days ago          Up 14 minutes                           c13
691b468918ee        ajnouri/apache_ssl_container   "/bin/sh -c 'servi..."   6 days ago          Up 14 minutes                           c12
1e2bb1933d10        ajnouri/apache_ssl_container   "/bin/sh -c 'servi..."   6 days ago          Up 14 minutes
And inspect macvlan attached containers with “docker network inspect macvlan10”
Container c11 is connected to macvlan10 (10.0.0.0/24) and got dynamically an ip from that range.
3) check connectivity
Now let’s do some connectivity checks inside container c11 (macvlan10) and see if it can reach its gateway (Router ona stick) outside docker host.
ajn@ubuntu:~$ docker exec c11 ping -t3 10.0.0.200
PING 10.0.0.200 (10.0.0.200) 56(84) bytes of data.
64 bytes from 10.0.0.200: icmp_seq=1 ttl=255 time=1.07 ms
64 bytes from 10.0.0.200: icmp_seq=2 ttl=255 time=1.50 ms
64 bytes from 10.0.0.200: icmp_seq=3 ttl=255 time=1.27 ms
64 bytes from 10.0.0.200: icmp_seq=4 ttl=255 time=1.40 ms
64 bytes from 10.0.0.200: icmp_seq=5 ttl=255 time=1.29 ms
^C

ajn@ubuntu:~$ docker exec c12 ping 20.0.0.200
PING 20.0.0.200 (20.0.0.200) 56(84) bytes of data.
64 bytes from 20.0.0.200: icmp_seq=1 ttl=255 time=2.22 ms
64 bytes from 20.0.0.200: icmp_seq=2 ttl=255 time=1.34 ms
64 bytes from 20.0.0.200: icmp_seq=3 ttl=255 time=1.23 ms
64 bytes from 20.0.0.200: icmp_seq=4 ttl=255 time=1.41 ms
^C

ajn@ubuntu:~$ docker exec c13 ping 30.0.0.200
PING 30.0.0.200 (30.0.0.200) 56(84) bytes of data.
64 bytes from 30.0.0.200: icmp_seq=1 ttl=255 time=1.76 ms
64 bytes from 30.0.0.200: icmp_seq=2 ttl=255 time=1.36 ms
64 bytes from 30.0.0.200: icmp_seq=3 ttl=255 time=1.42 ms
64 bytes from 30.0.0.200: icmp_seq=4 ttl=255 time=1.51 ms
64 bytes from 30.0.0.200: icmp_seq=5 ttl=255 time=1.39 ms
^C
Yes!!!
And can even reach Internet, thanks to router-on-stick
docker exec c11 ping gns3.com
PING gns3.com (104.20.168.3) 56(84) bytes of data.
64 bytes from 104.20.168.3: icmp_seq=1 ttl=51 time=2.54 ms
64 bytes from 104.20.168.3: icmp_seq=2 ttl=51 time=2.82 ms
64 bytes from 104.20.168.3: icmp_seq=3 ttl=51 time=2.62 ms
64 bytes from 104.20.168.3: icmp_seq=4 ttl=51 time=2.82 ms
^C
And that’s not all, it can even reach other containers, if you allow it of course. Cisco router used for that purpose, you can play with access control lists to implement the policy you want.
3- Configuring MACVLAN network on docker node2
The same steps are applied to Docker node 2. Interfaces are connected in the same way as node1: one interface to common vlan 114 and another trunk interface to create c21, c22 and C23 connected respectively to MacVLANs macvlan10, macvlan20 and macvlan30 (same as node1).
Node2 used different ip ranges than those used for each node1 VLAN:
| VLAN subnets | Node1 | Node2 |
| macvlan10 (10.0.0.0/24) | 10.0.0.0/26 | 10.0.0.64/26 |
| macvlan20 (20.0.0.0/24) | 20.0.0.64/26 | 20.0.0.0/26 |
| macvlan30 (30.0.0.0/24) | 30.0.0.128/26 | 30.0.0.0/26 |
1) Create MacVLAN networks
docker network create -d macvlan \
--subnet 10.0.0.0/24 \
--ip-range=10.0.0.64/26 \
--gateway=10.0.0.200 \
-o parent=ens33.10 macvlan10


docker network create -d macvlan \
--subnet 20.0.0.0/24 \
--ip-range=20.0.0.0/26 \
--gateway=20.0.0.200 \
-o parent=ens33.20 macvlan20


docker network create -d macvlan \
--subnet 30.0.0.0/24 \
--ip-range=30.0.0.0/26 \
--gateway=30.0.0.200 \
-o parent=ens33.30 macvlan30
2) start and connect containers to MacVLAN networks
docker run --net=macvlan10 -dt --name c21 --restart=unless-stopped ajnouri/apache_ssl_container
docker run --net=macvlan20 -dt --name c22 --restart=unless-stopped ajnouri/apache_ssl_container
docker run --net=macvlan30 -dt --name c23 --restart=unless-stopped ajnouri/apache_ssl_container
3) check connectivity
$ docker exec c22 ping 20.0.0.200
PING 20.0.0.200 (20.0.0.200) 56(84) bytes of data.
64 bytes from 20.0.0.200: icmp_seq=1 ttl=255 time=1.06 ms
64 bytes from 20.0.0.200: icmp_seq=2 ttl=255 time=1.51 ms
64 bytes from 20.0.0.200: icmp_seq=3 ttl=255 time=1.46 ms
^C
$ docker exec c23 ping 30.0.0.200
PING 30.0.0.200 (30.0.0.200) 56(84) bytes of data.
64 bytes from 30.0.0.200: icmp_seq=1 ttl=255 time=2.11 ms
64 bytes from 30.0.0.200: icmp_seq=2 ttl=255 time=1.42 ms
64 bytes from 30.0.0.200: icmp_seq=3 ttl=255 time=1.56 ms
And according to the deployed policy on the router inter-vlan communication is not allowed
$ docker exec c23 ping 10.0.0.200
PING 10.0.0.200 (10.0.0.200) 56(84) bytes of data.
From 30.0.0.200 icmp_seq=1 Packet filtered
From 30.0.0.200 icmp_seq=2 Packet filtered
From 30.0.0.200 icmp_seq=3 Packet filtered
Now let’s check communication between c11 (node1: macvlan10) and c21 (node2: macvlan10):
docker exec c21 ping 10.0.0.1
PING 10.0.0.1 (10.0.0.1) 56(84) bytes of data.
64 bytes from 10.0.0.1: icmp_seq=1 ttl=64 time=1.45 ms
64 bytes from 10.0.0.1: icmp_seq=2 ttl=64 time=0.879 ms
64 bytes from 10.0.0.1: icmp_seq=3 ttl=64 time=0.941 ms
^C
Nice!
Containers connected to the same network VLAN (from different docker nodes) talk to each other.
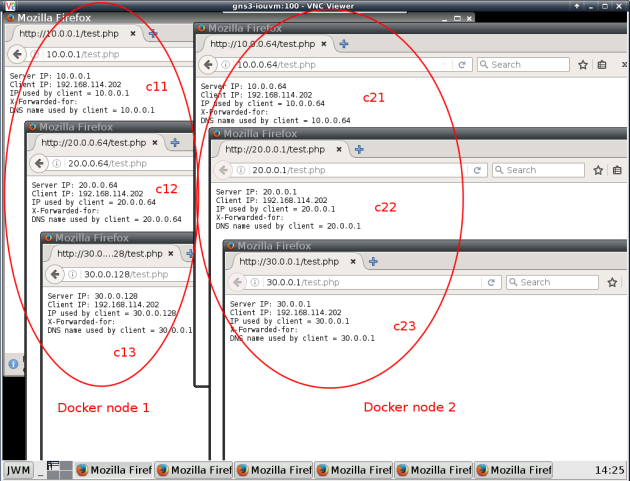
And to finish, from the GUI browser container gns3/webterm , let’s access all containers in both nodes… Yes, in GNS3 you can run Firefox in a container, no need for an entire VM for that :P-)
Troubleshooting:
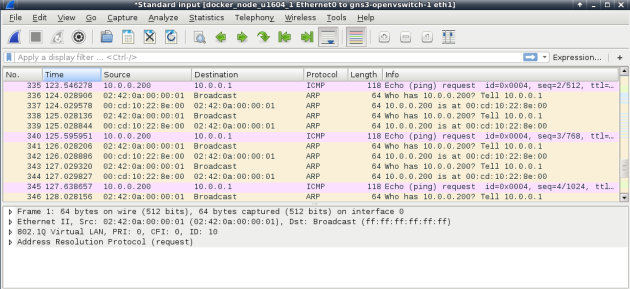
Without Promiscuous mode you’ll notice that container traffic reaches the outside network, but not the other way around, as shown below in the wireshark capture:
- 10.0.0.200=outside router
- 10.0.0.1=container behing MACVLAN
References:
- https://docs.docker.com/engine/reference/commandline/docker/
- https://docs.docker.com/engine/userguide/networking/get-started-macvlan/#macvlan-8021q-trunk-bridge-mode-example-usage
- http://xmodulo.com/how-to-use-virtual-ethernet-adapters-in-promiscuous-mode-on-vmware.html
- https://blog.codeship.com/ensuring-containers-are-always-running-with-dockers-restart-policy/


